Thursday, February 27, 2014

Pop Up Box Tutorial


                                           Tutorial for popup card in a box

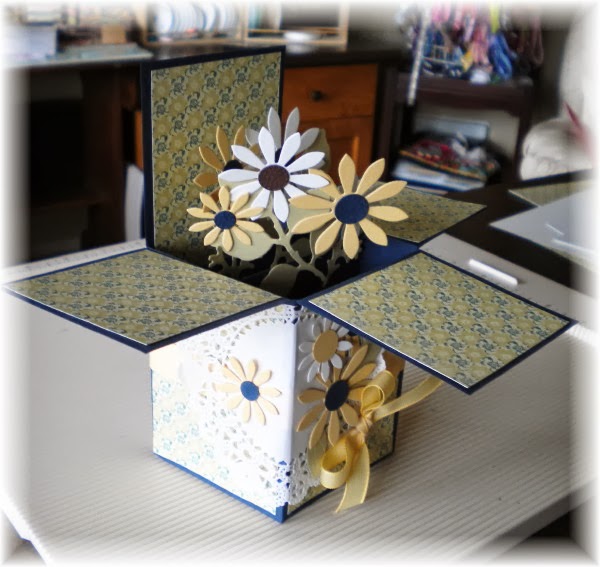
This will show you how easy it is to put together a 5 1/2 x 4 1/4 popup box card ... using just a regular sheet of cardstock 8 1/2 x 11... and some coordinating paper... great way to use those scraps!!!  Here is the card I made in this tutorial... lets get started... it really is "easy-peasy".


The supplies you will need....
8 1/2 x 11 card stock
scoring board
coordinating designer paper
bone folder
snail adhesive and sticky strip adhesive

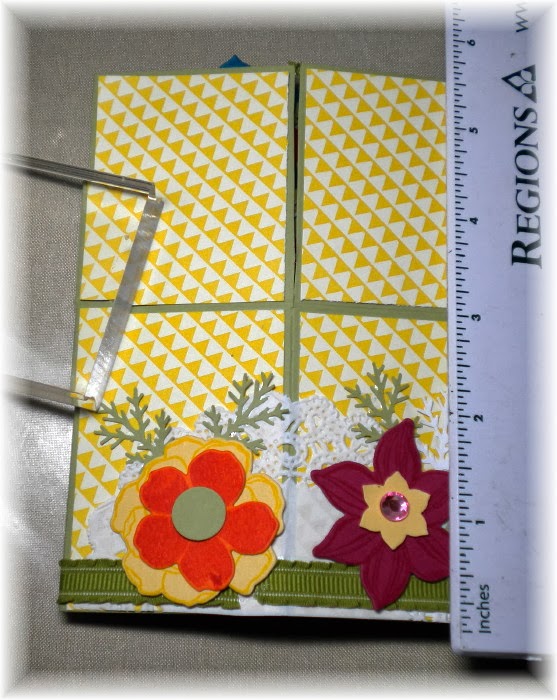
First, trim your card stock to 9 x 7 1/2.  With the 9" side up score at 2 1/8, 4 1/4, 6 3/8, and 8 1/2
Flip 90 degrees and score at 3".  Next trim 2" off the 7 1/2" side - now your piece is 9 x 5 1/2.  Keep that piece you cut off - we'll be using some of it later.  You should have 4 three inch and 4 two inch rectangles within your score lines as shown below.


Next you're going to set aside that 2" strip and concentrate on what will be the box.  The "rectangles" on the right side of the above picture measure 2" and those are going to be your flaps so go ahead and cut each one to the score line. Using your bone folder make your folds crisp - makes for a cleaner box. The little piece in the lower right gets removed completely.  With me so far?


Now... I went ahead for this step and cut out my dsp for the outside of the box as shown above and the 2" flaps are now cut to the center score line.  

DSP measurements 
Small flaps - 2 X 2 3/8 - cut 3 (or 6 if you want to decorate the underside of the flaps as I have done (below) - I think it looks nicer when the card is taken from the envelope.
Sentiment piece - 2 x 5 3/8 - this will also be the back side of the card/box
Large flaps for the box bottom - 2 x 2 7/8 - cut 3 - while it is unnecessary to put dsp on the inside of the box - but if you wish to, cut 6 of these.
 The white piece will be the back of your card where you can write or stamp your sentiments.


It's up to you at this point whether you want to decorate the sides of your box card before you tape it together.  I find it's ok either before or after as the card folds up nicely and makes it easy to work on the sides.


Time to use your sticky strip on that little tab and make your card a box.


Take that 2" strip that you cut off, and cut it at the point where you will have 1/2" score lines on each side as shown above.  Now cut that piece in half lengthwise, so you have two 1" pieces.  These are going inside to affix your goodies to.  Use sticky strip since these braces will need to be secure.


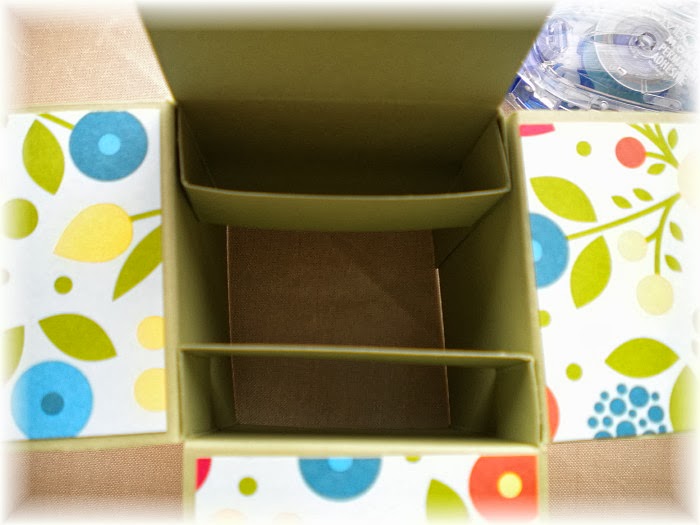
I went ahead and prepped 3 of those little 'braces' to add stability to the box.  It also gives you one more surface upon which to place decorations - love that!!


Start your decorating and have fun with this.  It's not as intimidating as you thought, right?  I used SU's Secret Garden stamp set and dies for this project.  And, my favorite little Martha Stewart fern punch got lots of use too.  It doesn't matter what you choose, it's gonna be cute; just be sure to try to keep the deco's in the middle.  Too much hanging out (like my turquoise butterfly) and it's going to require a larger envelope.


Showing the box 'closed' and ready for mailing.


See?  It really is just 5 1/2 x 4 1/4


A couple more views of the sides.


Here are the two together.


I hope you've enjoyed this tutorial.  Give it a try... lots of decoration possibilities!  And, as always, comments are always welcome.  Thanks for visiting.

Happy Stamping'

Pat


Wednesday, February 26, 2014

Pop Up Box card


                                          A card ... A box ... A bouquet

If you had to categorize this, where would you put it?  A card?  A box?  A bouquet?  Turns out this is all those things... a card which collapses into an envelope, a box that pops open when you tweak it, and (in this case) a bouquet of flowers. A little "aside" here - but that last line almost reminds me of "turducken" ... which, if you've ever lived in the deep south, you'll recognize as a chicken inside a duck inside a turkey!  But, I digress (LOL). 

 My girlfriend came over last weekend and we made these from a tutorial by Dina Kowal on Splitcoast Stampers.  This finished card fits in a 6" x 9" envelope for mailing.  This was so much fun and I can imagine the possibilities are endless when it comes to decorating it.  

Tomorrow I am preparing a step by step tutorial (with lots of pictures) on how to make this box card in an A2 size - 5 1/2 X 4 1/4.  Be sure to come back for that one!


Be sure to come back tomorrow for my tutorial.  I think you'll enjoy it.

Happy Hump Day!!!


Tuesday, February 25, 2014

Weekly Deals Feb 25


Feb 25Weekly Deals

WEEKLY DEALS

We hope you enjoy this week's Weekly Deals!


Backyard Basics Framelits Dies Item # 129380
Regular Price: 24.95 US/30.95 CAN
Discounted Price: 18.71 US/23.21 CAN


Gold Metallic Encore Pad Item # 132141
Regular Price: 9.95 US/12.95 CAN
Discounted Price: 7.46 US/9.71 CAN


Basics Glimmer Brads Item # 121003
Regular Price: 4.95 US/6.5 CAN
Discounted Price: 3.71 US/4.88 CAN


Paper Doily Sizzlits Die Item # 125592
Regular Price: 21.95 US/26.95 CAN
Discounted Price: 16.46 US/20.21 CAN


Primrose Petals 3/8" Stitched Satin Ribbon Item # 126844
Regular Price: 8.95 US/12.25 CAN
Discounted Price: 6.71 US/9.19 CAN


Summer Starfruit 3/8" Stitched Satin Ribbon Item # 126846
Regular Price: 8.95 US/12.25 CAN
Discounted Price: 6.71 US/9.19 CAN


Season By Season Kit - Digital Download Item # 130060
Regular Price: 9.95 US/10.95 CAN
Discounted Price: 5.97 US/6.57 CAN


Have fun shopping!!!

Monday, February 24, 2014

Crazy Card Club Feb


                                                      Baby Card for CCC

I've mentioned before that I am lucky enough to belong to a fabulous monthly "crazy card club" - such talented stampers!!  Each month there is a theme and this time it was baby or bride.  I really wanted to use this giraffe stamp by Inkadinkadoo.  I've had him 'forever' and love to use him.  

I started by stamping Mr. Giraffe on whisper white with brown memento ink and coloring him with my copics.  I used some really old, but very cute, Stampin Up paper (I don't know the name of it).  It isn't even double sided... if that tells you its generation.  Anyhoo, it looked like so saffron and either certainly celery or wild wasabi would match pretty well... this particular one has the wild wasabi.  I created a bit of interest with some ric-rac and the scallop punch.  I also used baker's twine to embellish the punched-out paper button - real buttons are so difficult to mail, don't you agree?  I also had fun with my new scallop tag punch (which was added as an afterthought - should have run it through an embossing folder (afterthought number 2 - too late!).  The sentiment is from Fast and Fun notes which is a retired SU set and my modern label punch.


I hope you've enjoyed this a fun little card - hope the "crazies" like it too  :-)

I'll be back in a day or two ...I have a super-fun project to show you.  Another step by step tutorial with pictures.  

Happy Stamping

Wednesday, February 19, 2014

Valentine Bunco


Valentine Bunco and Dinner with Aly


Several posts ago I shared pictures of the prizes I had made for our Bunco group.  I thought I'd show you some pictures of the event.  Be sure to check out all the pictures because at the end I have shared some of our Valentine's celebration with our gorgeous granddaughter and handsome boyfriend!!!  I'll have more stamping stuff tomorrow, but this time it's all about my friends and family.... :-).


one of the tables 'partially set' - I was running around so much I decided I needed to stop and get pictures... whether the tables were done or not.  I see "wrinkles" are in :-)


Using my favorite SU die, these bows came out so cute that.....


my friend Dot decided she needed it as a wardrobe accessory ... how cool is that?


I also made a chicken/artichoke casserole, but had to take a picture of this salad.  I must say it's just as pretty as the pinterest picture which inspired it... yummy too!!!


And here are some of our 'Bunco Babes' (as I like to call us).  We travel from table to table during the rounds so, unfortunately,  I missed a few gals in the pictures - sorry!  So love my bunco group!!!  That was all about Tuesday night... then Friday night (Valentine's Day) we had more fun!!!  read on............

...................................................................................................................................................................

Valentine's Dinner with the 'pretty people'


We were being serenaded when Aly and Vic arrived - he immediately began singing with the group.  Unfortunately, the guitar obliterates it, but it was !really neat.


Really had a fun time with them at Guadalajara's - good food and lots of laughs!!!

I loved my week!


Tuesday, February 18, 2014

Weekly Deals Feb 17


This week's weekly deals - Feb 17 thru Feb 24


February18

WEEKLY DEALS

We hope you enjoy this week's Weekly Deals!


In Color Dahlias Item # 127556
Regular Price: $7.95 US/$9.95 CAN
Discounted Price: $5.96 US/$7.46 CAN


Label Insert Pop' N Cuts Die Item # 130160
Regular Price: $21.95 US/$26.95 CAN
Discounted Price: $16.46 US/$20.21 CAN


Gold & Silver Stampin' Glitter  Item # 132205Regular Price: $7.95 US/$9.95 CAN
Discounted Price: $5.96 US/$7.46 CAN


Silver Metallic Encore Pad Item # 132142
Regular Price: $9.95 US/$12.95 CAN
Discounted Price: $7.46 US/$9.71 CAN


Petals-A-Plenty Textured Impressions Embossing Folder Die Item # 116824Regular Price: $7.95 US/$9.95 CAN
Discounted Price: $5.96 US/$7.46 CAN


3/16 Inch Corner Punch  Item # 119871
Regular Price: $6.95 US/$8.95 CAN
Discounted Price: $5.21 US/$6.71 CAN


Etcetera Designer Series Paper  Item # 130129
Regular Price: $10.95 US/$13.50 CAN
Discounted Price: $8.21 US/$10.13 CAN


A Royal Day Ensemble - Digital Download Item # 130079
Regular Price: $14.95 US/$16.50 CAN
Discounted Price: $8.97 US/$9.90 CAN

COMMENT

Monday, February 17, 2014

SAB Petal Parade


                                      Sale a Bration PETAL PARADE


When it comes to stamping the question is often asked "how many flower stamps do you need"?  Well, that's a tough one since florals seem to be useful in all sorts of designs.  Little ones make great embellishments and big ones stand alone - other flowers create wonderful background images and on and on it goes.  So, I ignore that question ... if it appeals to you, go for it ... it will get lots of use!

I want to credit each designer but I'll withhold comment and just let you enjoy the inspiration!  

Stampin Up Petal Parade card by Sandi @ www.stampingwithsandi.com
by Sandi MacIver


She made the DSP with Petal Parade stamps and ink to match some SU paper sets. pool party, summer starfruit and

by Monica Gale


Mary's sweet card uses Petal Parade, Sweet Sorbet twine, & Decorative Dots embossing folder - all from SAB, plus Geometrical and the Scallop Tag Topper Punch. All supplies from Stampin' Up!

by Mary Brown


Stampin Up! Sale-A-Bration, Petal Parade, Fähnchenfieber, Rainbow-Colors

by Claudia Ficht

Stampin' Up!, Perfect Pennants, Sale-a-bration,  Petal Parade, Flower Shop, Chevron ribbon.  details on my blog

by Laura Milligan

Lovely, so pretty! Soft colors, nice design.

by the crafty owl

Handmade birthday card by Michele Reynolds, Inspiration Ink, using Stampin' Up! products - Petal Parade Set, Best of Sale-A-Bration Set, Perfectly Penned Set, Adorning Accents Edgelits, and Scallops Embossing Folder.  Sale-A-Bration 2014.

by Michele Reynolds


Do you have a favorite?  I know, it's hard isn't it?  This week's samples have been fun and I hope you've been inspired to try some of these ideas.  

Have a great weekend and let's get together again next week!

Happy Stamping!!!

Pat